安卓okhttp3进行网络请求,一个简单的登录页面的实现
文章目录
一、前言
 写在文章的前面:为了不浪费大家的时间,本文只是为了记录一下自己开发过程中遇到的问题,而且这只是一个最简单的登录页面的实
 现,不能解决安卓大佬开发上的任何问题,只是给我自己或者和我一样的0基础的人看的。

 本文通过okhttp3实现安卓app进行后台webapi的网络访问。
 初学android,想开发一个简单的app,在网上查阅了大量的资料,但是都是一些很老的教程了,虽然适用,但是讲的不是很清楚,对
 没有系统学习过安卓的人来说很不友好。
二、配置okhttp3
<!--在app目录下的 build.gradle文件中添加 -->

dependencies {
    implementation("com.squareup.okhttp3:okhttp:4.1.0")
}

<!-- AndroidManifest.xml文件中添加 -->
<!--开启网络权限,不然不能进行网络访问-->
<uses-permission android:name="android.permission.INTERNET" />
三、activity_main.xml文件
因为是登录界面,并且只作为示范,所以样式简陋,将就着能用就好。
<?xml version="1.0" encoding="utf-8"?>
<androidx.constraintlayout.widget.ConstraintLayout xmlns:android="http://schemas.android.com/apk/res/android"
    xmlns:app="http://schemas.android.com/apk/res-auto"
    xmlns:tools="http://schemas.android.com/tools"
    android:layout_width="match_parent"
    android:layout_height="match_parent"
    tools:context=".MainActivity">

    <EditText
        android:id="@+id/edit_username"
        android:layout_width="0dp"
        android:layout_height="wrap_content"
        android:layout_marginStart="160dp"
        android:layout_marginLeft="160dp"
        android:layout_marginTop="116dp"
        android:layout_marginEnd="38dp"
        android:layout_marginRight="38dp"
        android:ems="10"
        android:hint="@string/edit_message"
        android:inputType="textPersonName"
        app:layout_constraintEnd_toEndOf="parent"
        app:layout_constraintHorizontal_bias="0.688"
        app:layout_constraintStart_toEndOf="@+id/textView2"
        app:layout_constraintStart_toStartOf="parent"
        app:layout_constraintTop_toTopOf="parent" />

    <TextView
        android:id="@+id/textView2"
        android:layout_width="0dp"
        android:layout_height="46dp"
        android:layout_marginStart="39dp"
        android:layout_marginLeft="39dp"
        android:layout_marginEnd="9dp"
        android:layout_marginRight="9dp"
        android:gravity="center"
        android:text="@string/edit_username_title"
        app:layout_constraintBaseline_toBaselineOf="@+id/edit_username"
        app:layout_constraintEnd_toStartOf="@+id/edit_username"
        app:layout_constraintHorizontal_bias="0.0"
        app:layout_constraintStart_toStartOf="parent" />

    <TextView
        android:id="@+id/textView3"
        android:layout_width="138dp"
        android:layout_height="152dp"
        android:layout_marginStart="39dp"
        android:layout_marginLeft="39dp"
        android:layout_marginEnd="10dp"
        android:layout_marginRight="10dp"
        android:gravity="center"
        android:text="@string/edit_password_title"
        app:layout_constraintBaseline_toBaselineOf="@+id/edit_password"
        app:layout_constraintEnd_toStartOf="@+id/edit_password"
        app:layout_constraintStart_toStartOf="parent" />

    <EditText
        android:id="@+id/edit_password"
        android:layout_width="wrap_content"
        android:layout_height="wrap_content"
        android:layout_marginTop="24dp"
        android:layout_marginEnd="37dp"
        android:layout_marginRight="37dp"
        android:ems="10"
        android:hint="@string/edit_message_password"
        android:inputType="textPassword"
        app:layout_constraintEnd_toEndOf="parent"
        app:layout_constraintStart_toEndOf="@+id/textView3"
        app:layout_constraintTop_toBottomOf="@+id/edit_username" />

    <Button
        android:id="@+id/btn_login"
        android:layout_width="wrap_content"
        android:layout_height="wrap_content"
        android:layout_marginTop="84dp"
        android:onClick="login"
        android:text="@string/button_send"
        app:layout_constraintStart_toEndOf="@+id/textView3"
        app:layout_constraintTop_toBottomOf="@+id/edit_password" />

</androidx.constraintlayout.widget.ConstraintLayout>
四、MainActivity的实现
//包名自己导自己的
import androidx.appcompat.app.AppCompatActivity;

import android.content.Intent;
import android.os.Bundle;
import android.util.JsonToken;
import android.util.Log;
import android.view.View;
import android.widget.Button;
import android.widget.EditText;
import android.widget.FrameLayout;
import android.widget.Toast;

import org.json.JSONArray;

import okhttp3.FormBody;
import okhttp3.OkHttpClient;
import okhttp3.Request;
import okhttp3.Response;

public class MainActivity extends AppCompatActivity {

    public static final String EXTRA_MESSAGE ="com.example.myapplication.MESSAGE";


    public EditText edit_username;
    public EditText edit_password;

    public Button btn_login;

    @Override
    protected void onCreate(Bundle savedInstanceState) {
        super.onCreate(savedInstanceState);
        setContentView(R.layout.activity_main);
    }


    public void login(View view){

        btn_login = (Button)findViewById(R.id.btn_login);
        btn_login.setOnClickListener(new View.OnClickListener() {
            @Override
            public void onClick(View v) {

				//千万注意这一点,要写入新线程里,不能写到主线程内。
                new Thread(new Runnable() {
                    @Override
                    public void run() {
                        try{
                            edit_username = (EditText) findViewById(R.id.edit_username);
                            edit_password  = (EditText) findViewById(R.id.edit_password);

                            //获取文本框输入的内容
                            String username = edit_username.getText().toString();
                            String password = edit_password.getText().toString();

                            Log.d("账号" ,username);
                            Log.d("密码" ,password);

                            //重点在这里
                            //因为要实现的是登录,所以使用post请求,因为要生成如下请求,
							//即http://localhost:8080/user/login?username=xxx&password=xxx
							//所以使用FormBody,对应的是Spring中的@RequestBody,Springboot中的@RestController
                            FormBody.Builder params = new FormBody.Builder();
                            //将用户名密码添加进去
                            params.add("username",username);
                            params.add("password",password);

                            Log.d("参数",params+"");

                            //创建OkHttpClient实例,url写的是你自己后台的接口
                            OkHttpClient client = new OkHttpClient();
                            Request request = new Request.Builder()
                                    .url("http://127.0.0.1:8081/user/login")
                                    .post(params.build())
                                    .build();
                            Log.d("URL",request+"");
							//创建response,并且接收返回的token
                            Response response = client.newCall(request).execute();
                            String responseData = response.body().string();
                            //跳转页面,第一个参数当前页面,第二个参数跳转页面
                            Intent intent = new Intent(MainActivity.this,SecondActivity.class);
                            startActivity(intent);


							//android studio里的打印到控制台
                            Log.d("输出结果:",responseData);
                        }catch (Exception e){
                            e.printStackTrace();
							//同样写入线程,不然会报错
                            runOnUiThread(new Runnable() {
                                @Override
                                public void run() {
									//失败的提示信息
                                    Toast.makeText(MainActivity.this,"网络连接失败!",Toast.LENGTH_SHORT).show();
                                }
                            });

                        }
                    }
                }).start();
                //线程的这里一定要写start开启,不然线程不会运行
            }
        });
    }
}
五、SecondActivity实现
    //SecondActivity写自己要实现的内容,本文只演示登录和跳转
    @Override
    protected void onCreate(Bundle savedInstanceState) {
        super.onCreate(savedInstanceState);
        setContentView(R.layout.activity_second);

    }
六、activity_second.xml
<?xml version="1.0" encoding="utf-8"?>
<androidx.constraintlayout.widget.ConstraintLayout xmlns:android="http://schemas.android.com/apk/res/android"
    xmlns:app="http://schemas.android.com/apk/res-auto"
    xmlns:tools="http://schemas.android.com/tools"
    android:layout_width="match_parent"
    android:layout_height="match_parent"
    tools:context=".SecondActivity">

    <TextView
        android:id="@+id/textView5"
        android:layout_width="wrap_content"
        android:layout_height="wrap_content"
        android:layout_marginTop="214dp"
        android:text="看到这个说明登录成功"
        app:layout_constraintEnd_toEndOf="parent"
        app:layout_constraintStart_toStartOf="parent"
        app:layout_constraintTop_toTopOf="parent" />
</androidx.constraintlayout.widget.ConstraintLayout>
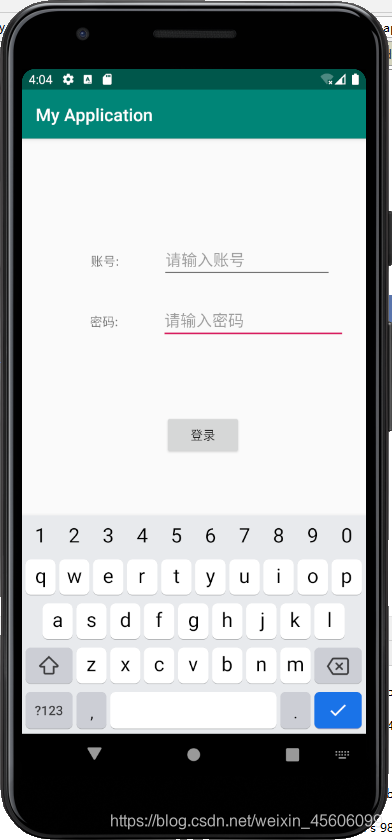
七、登录页面
 写在文章末,虽然是一个很简单的demo,来源也都是网上资源的整合,不过也算是记录一下自己开发的第一个页面了,后面可能会一步
 步的跟进我项目的开展,继续写一些学习过程中遇到的问题。仅作为记录生活使用。本代码复制即可运行,如果能帮到您,万分荣幸。
转载自CSDN-专业IT技术社区
原文链接:https://blog.csdn.net/weixin_45606099/article/details/111770823
 Android