
博主介绍:✌全网粉丝10W+,前互联网大厂软件研发、集结硕博英豪成立工作室。专注于计算机相关专业项目实战6年之久,选择我们就是选择放心、选择安心毕业✌
> 🍅想要获取完整文章或者源码,或者代做,拉到文章底部即可与我联系了。🍅🍅感兴趣的可以先收藏起来,点赞、关注不迷路,大家在毕设选题,项目以及论文编写等相关问题都可以给我留言咨询,希望帮助同学们顺利毕业 。🍅
1、毕业设计:2026年计算机专业毕业设计选题汇总(建议收藏)✅
2、大数据毕业设计:2026年选题大全 深度学习 python语言 JAVA语言 hadoop和spark(建议收藏)✅
🍅感兴趣的可以先收藏起来,点赞、关注不迷路,大家在毕设选题,项目以及论文编写等相关问题都可以给我留言咨询,希望帮助同学们顺利毕业 。🍅
1、项目介绍
技术栈:
Python语言、Pyqt5图形界面、YOLOv5、深度学习、Pytorch、CRNN卷积神经网络、matplotlib可视化、停车计费、MySQL数据库
2、项目界面
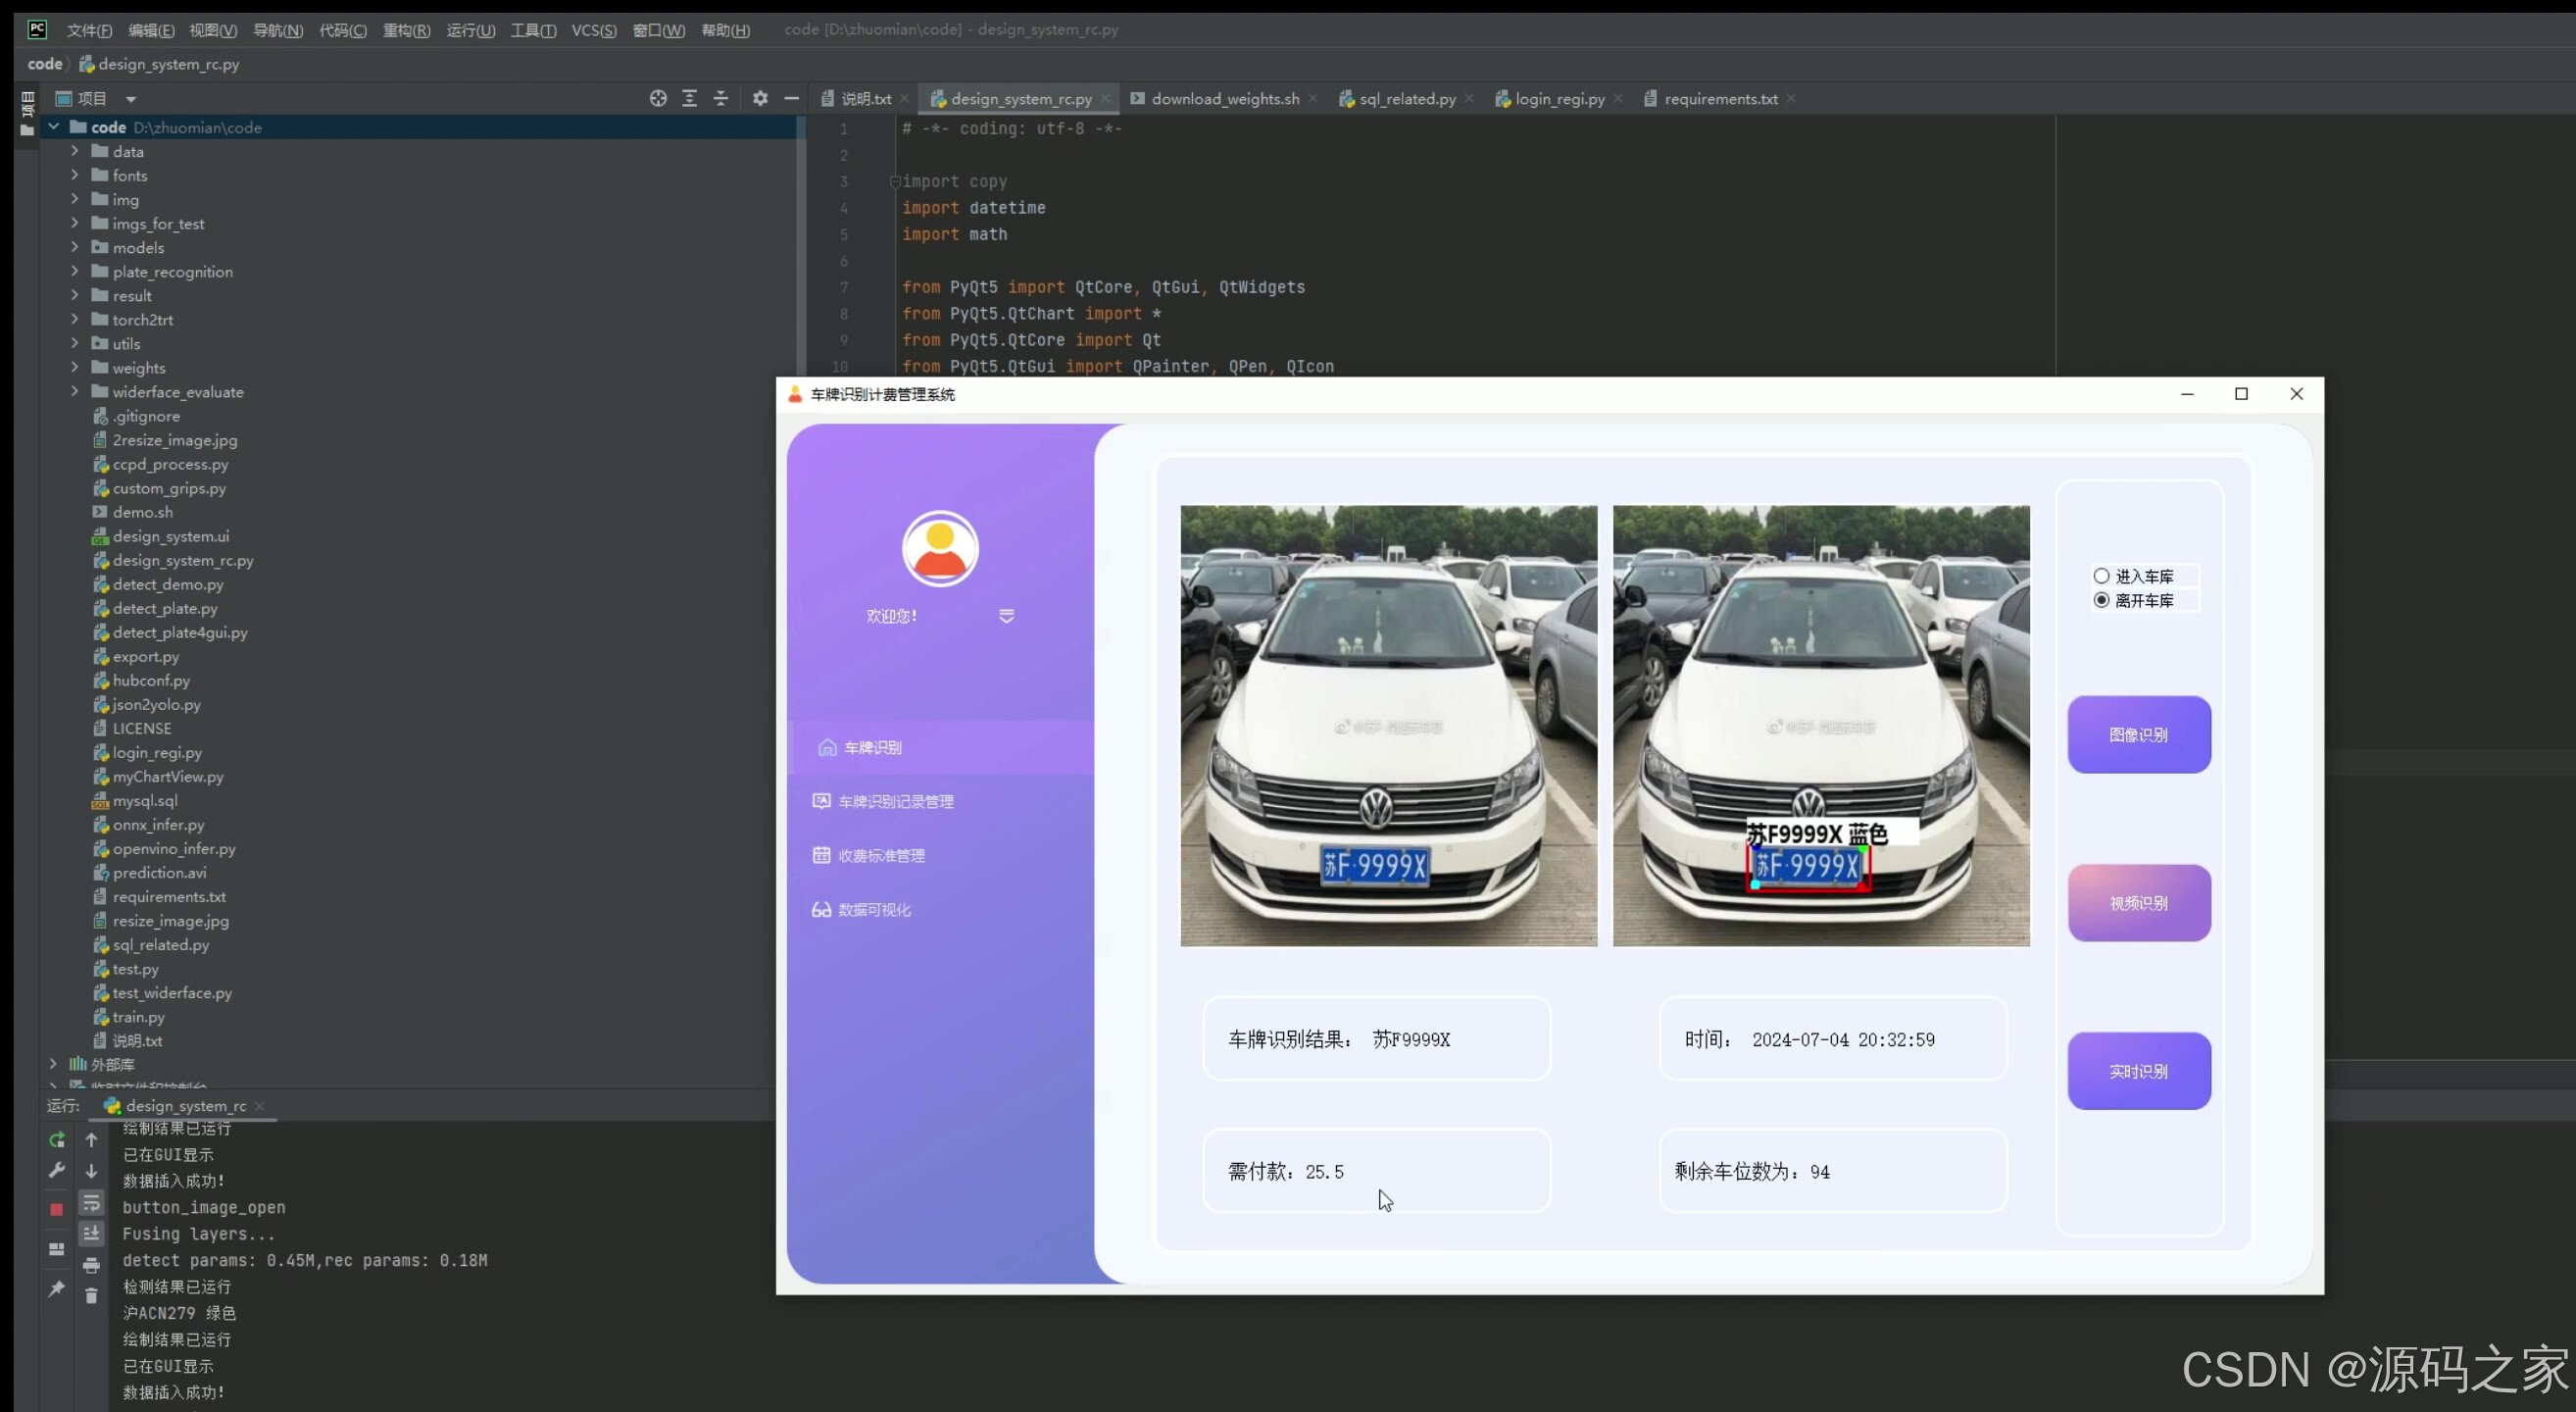
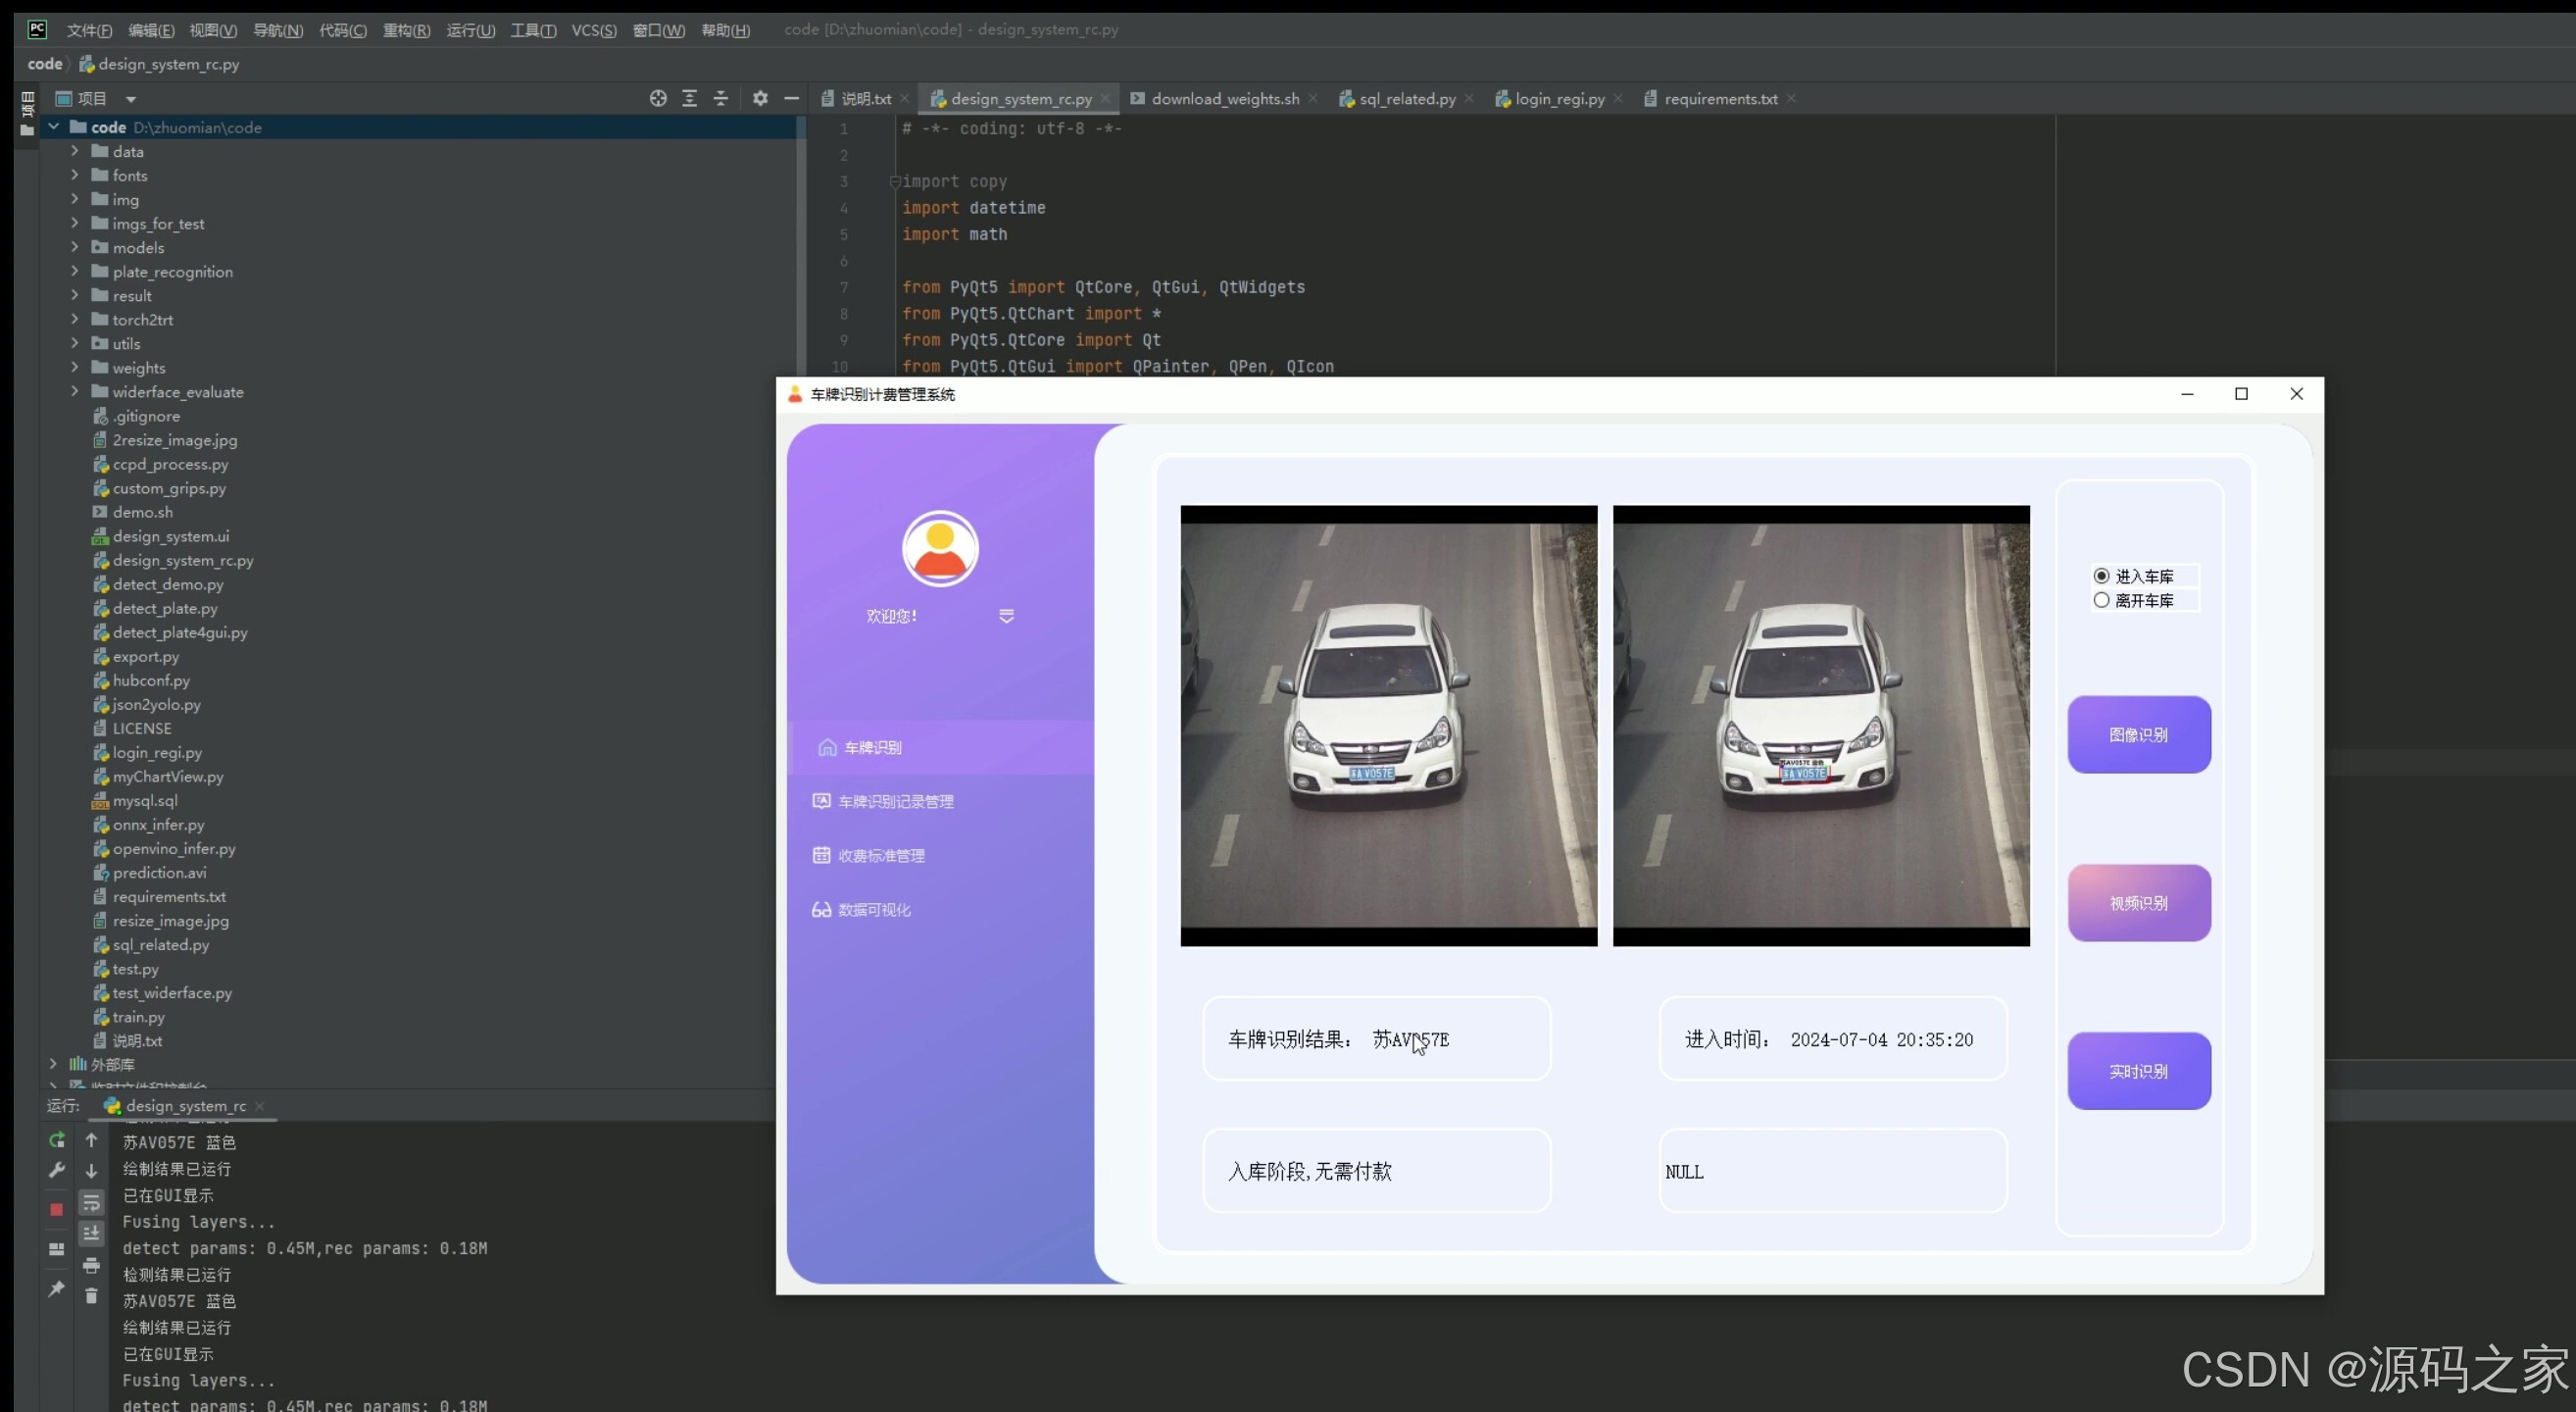
(1)出库–车牌识别计费
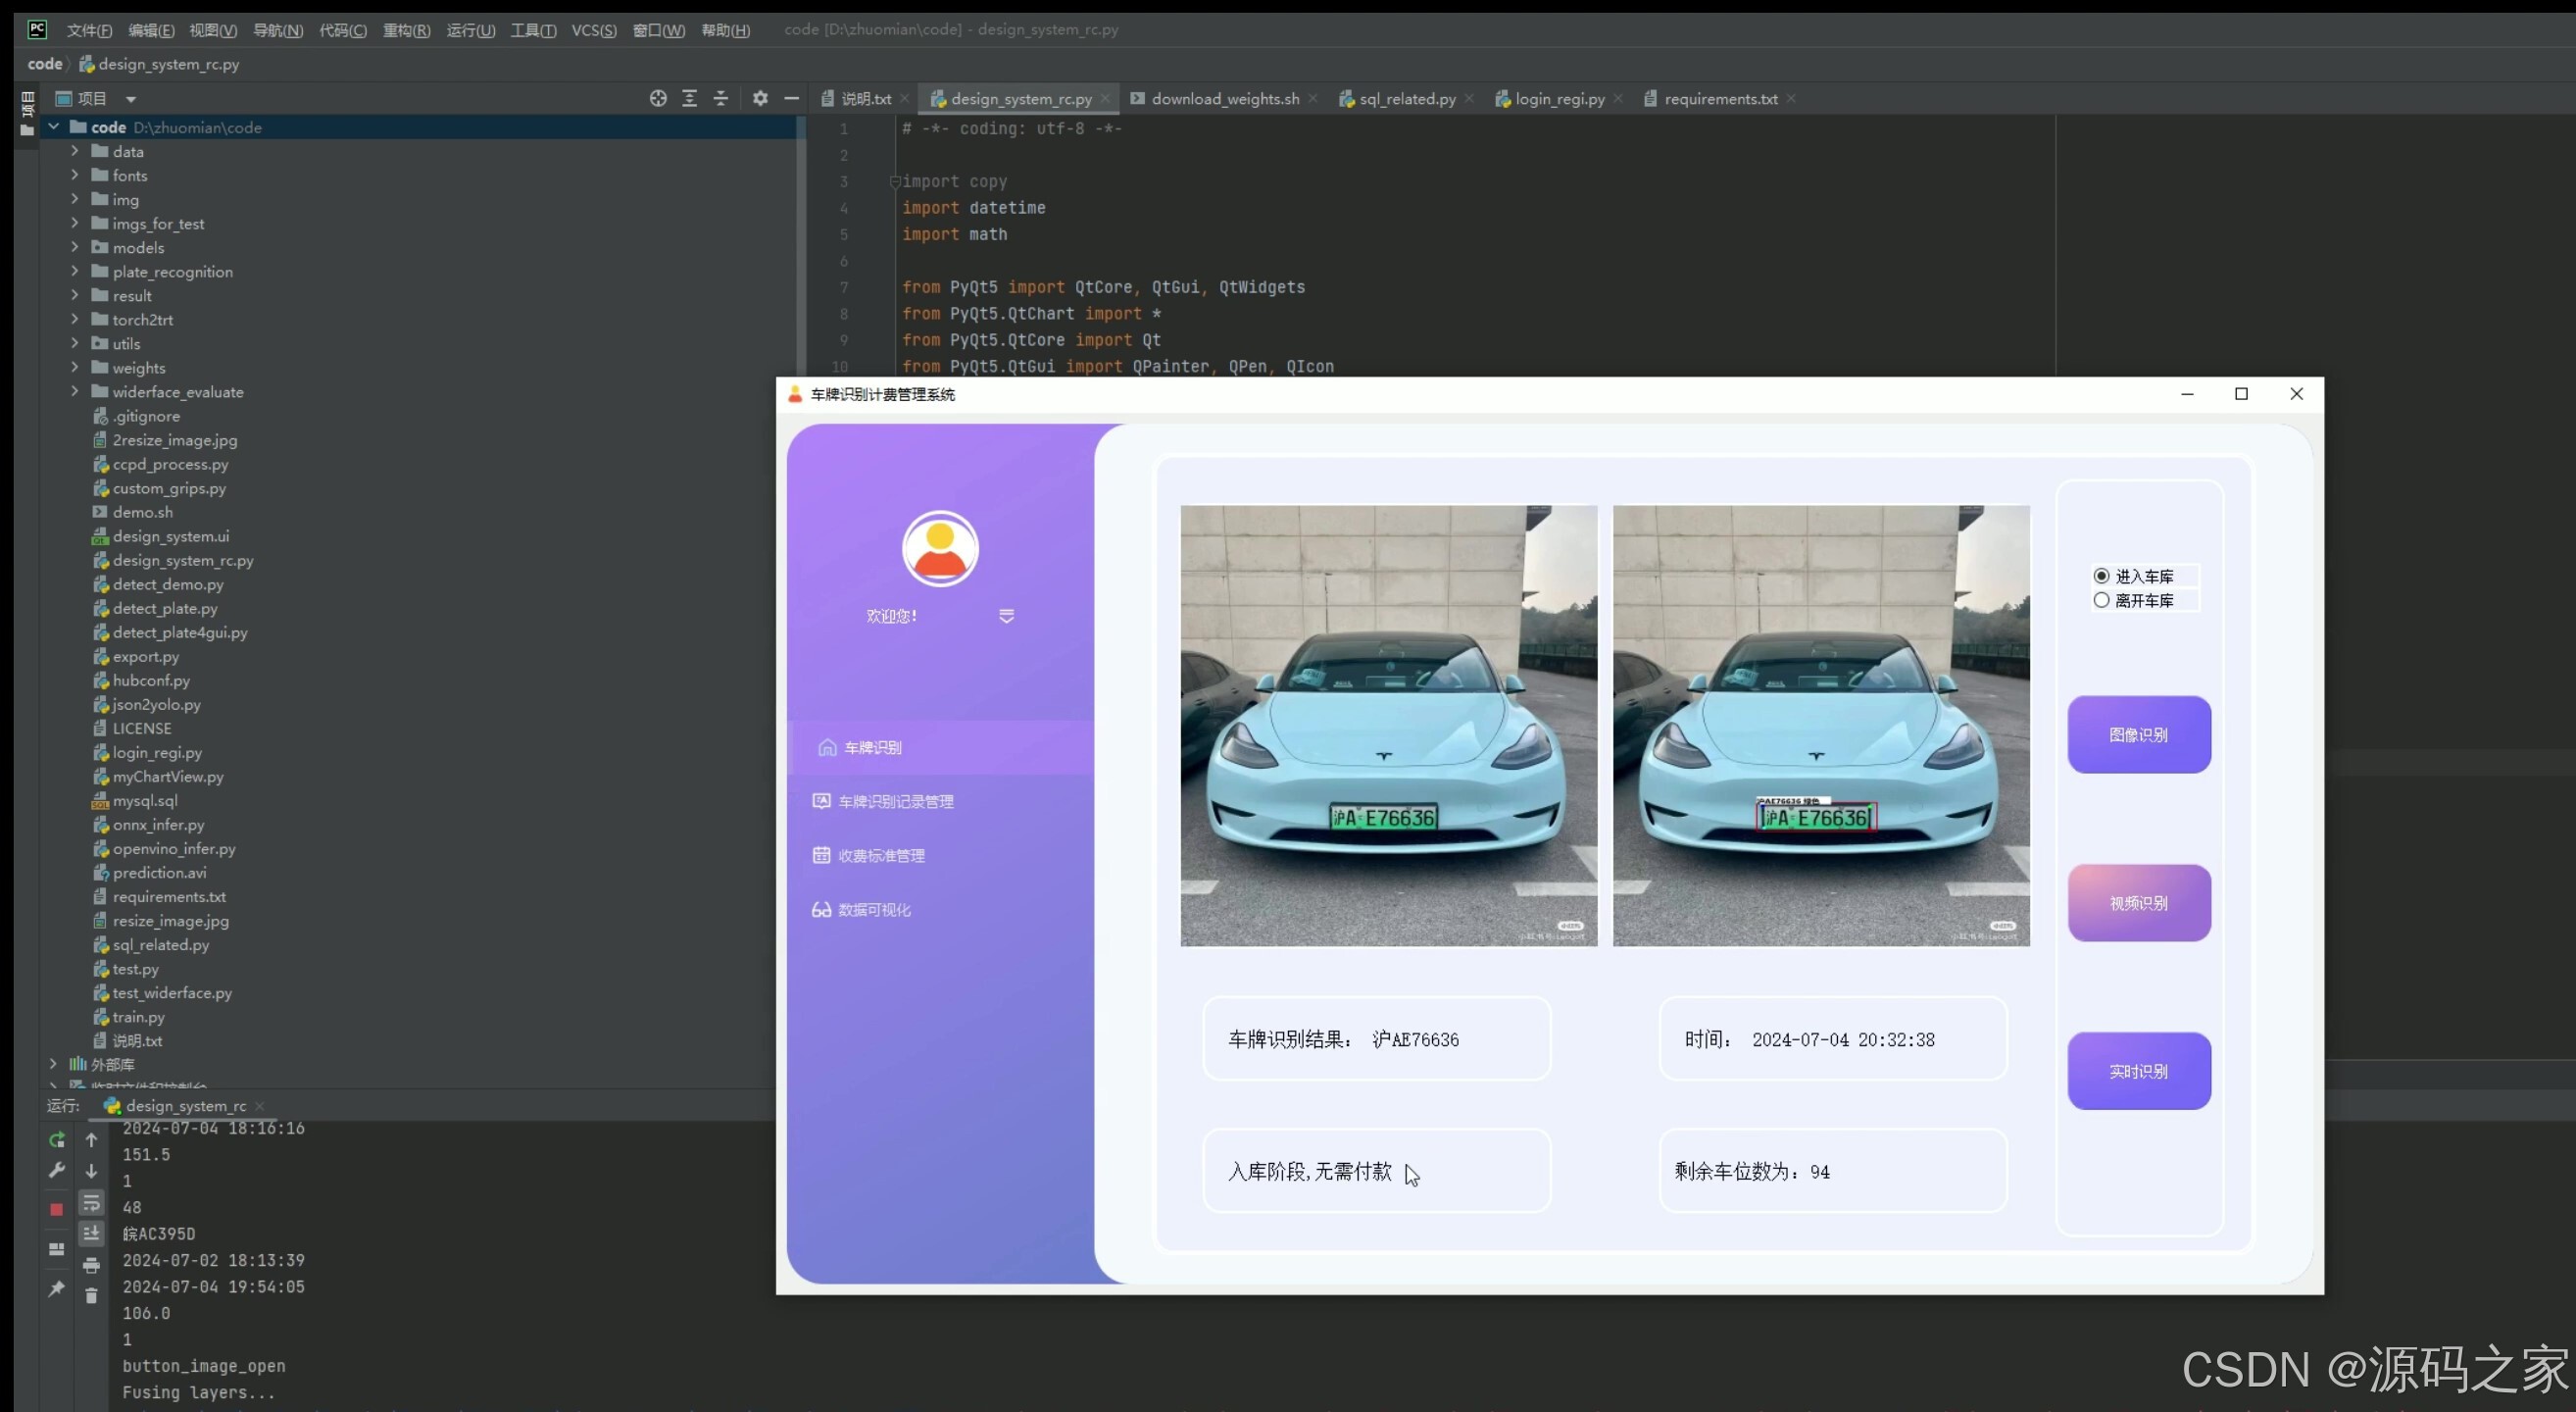
(2)入库–车牌识别
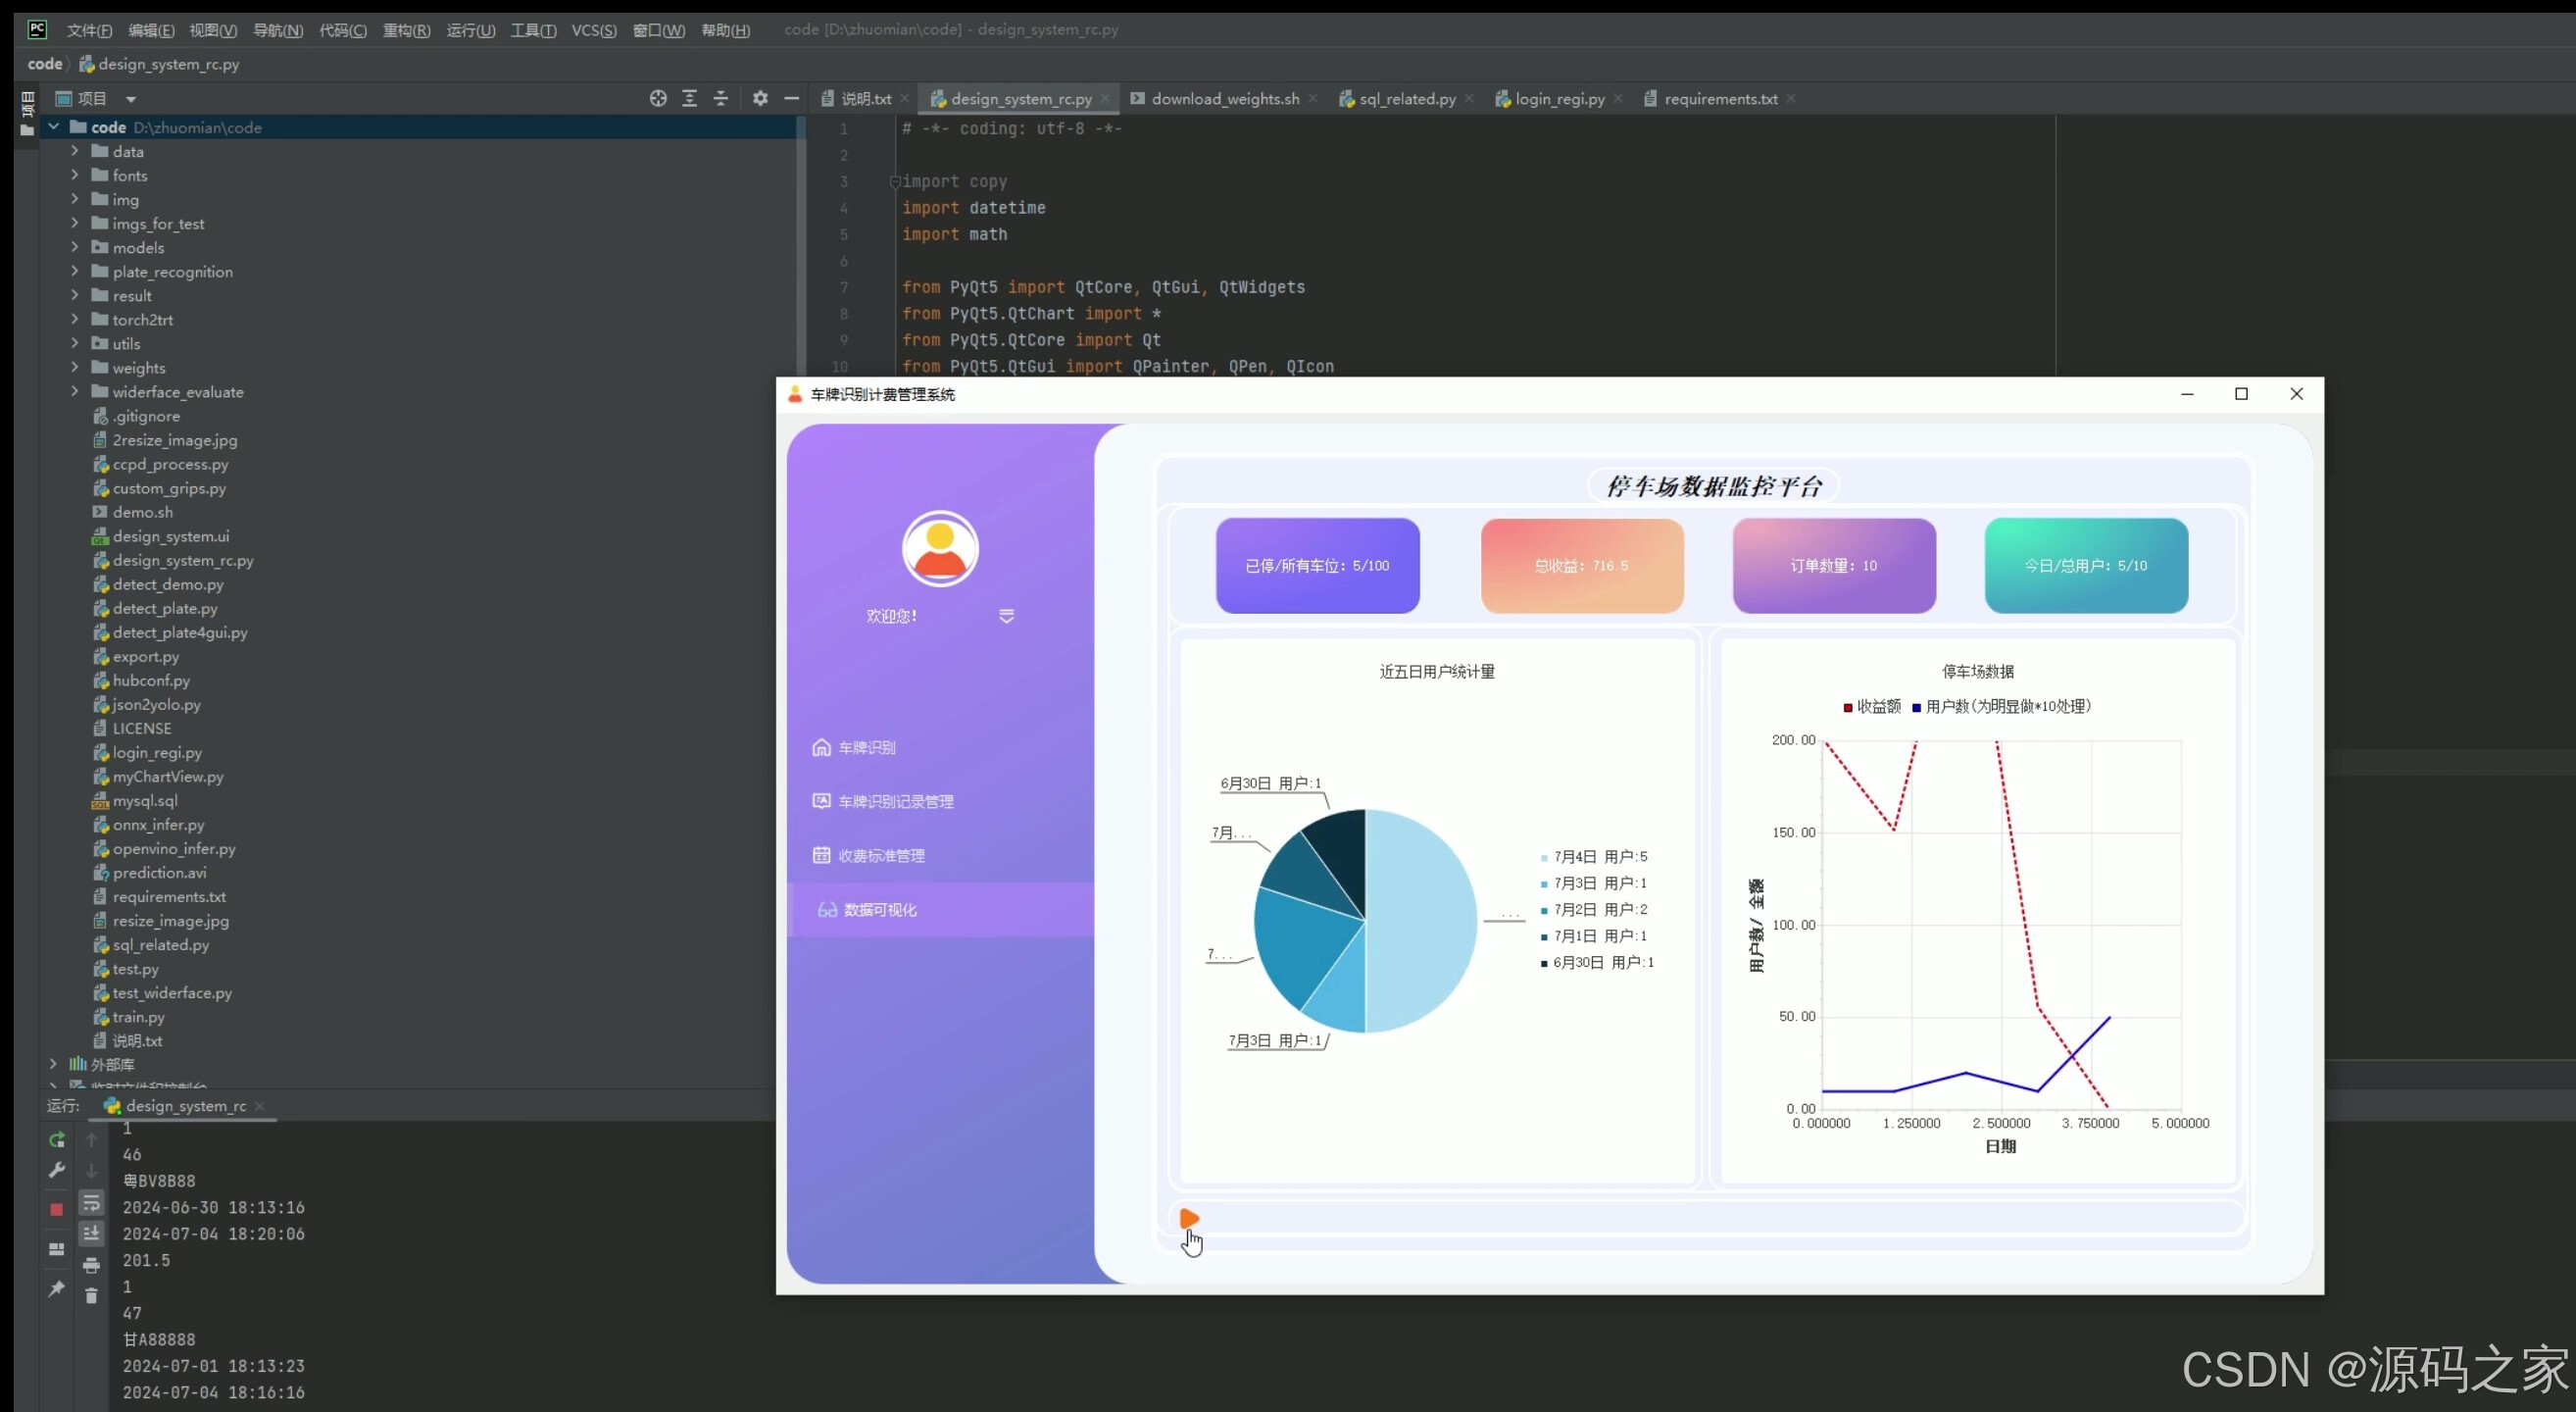
(3)数据分析可视化–停车数据、收费统计数据、饼图、折线图
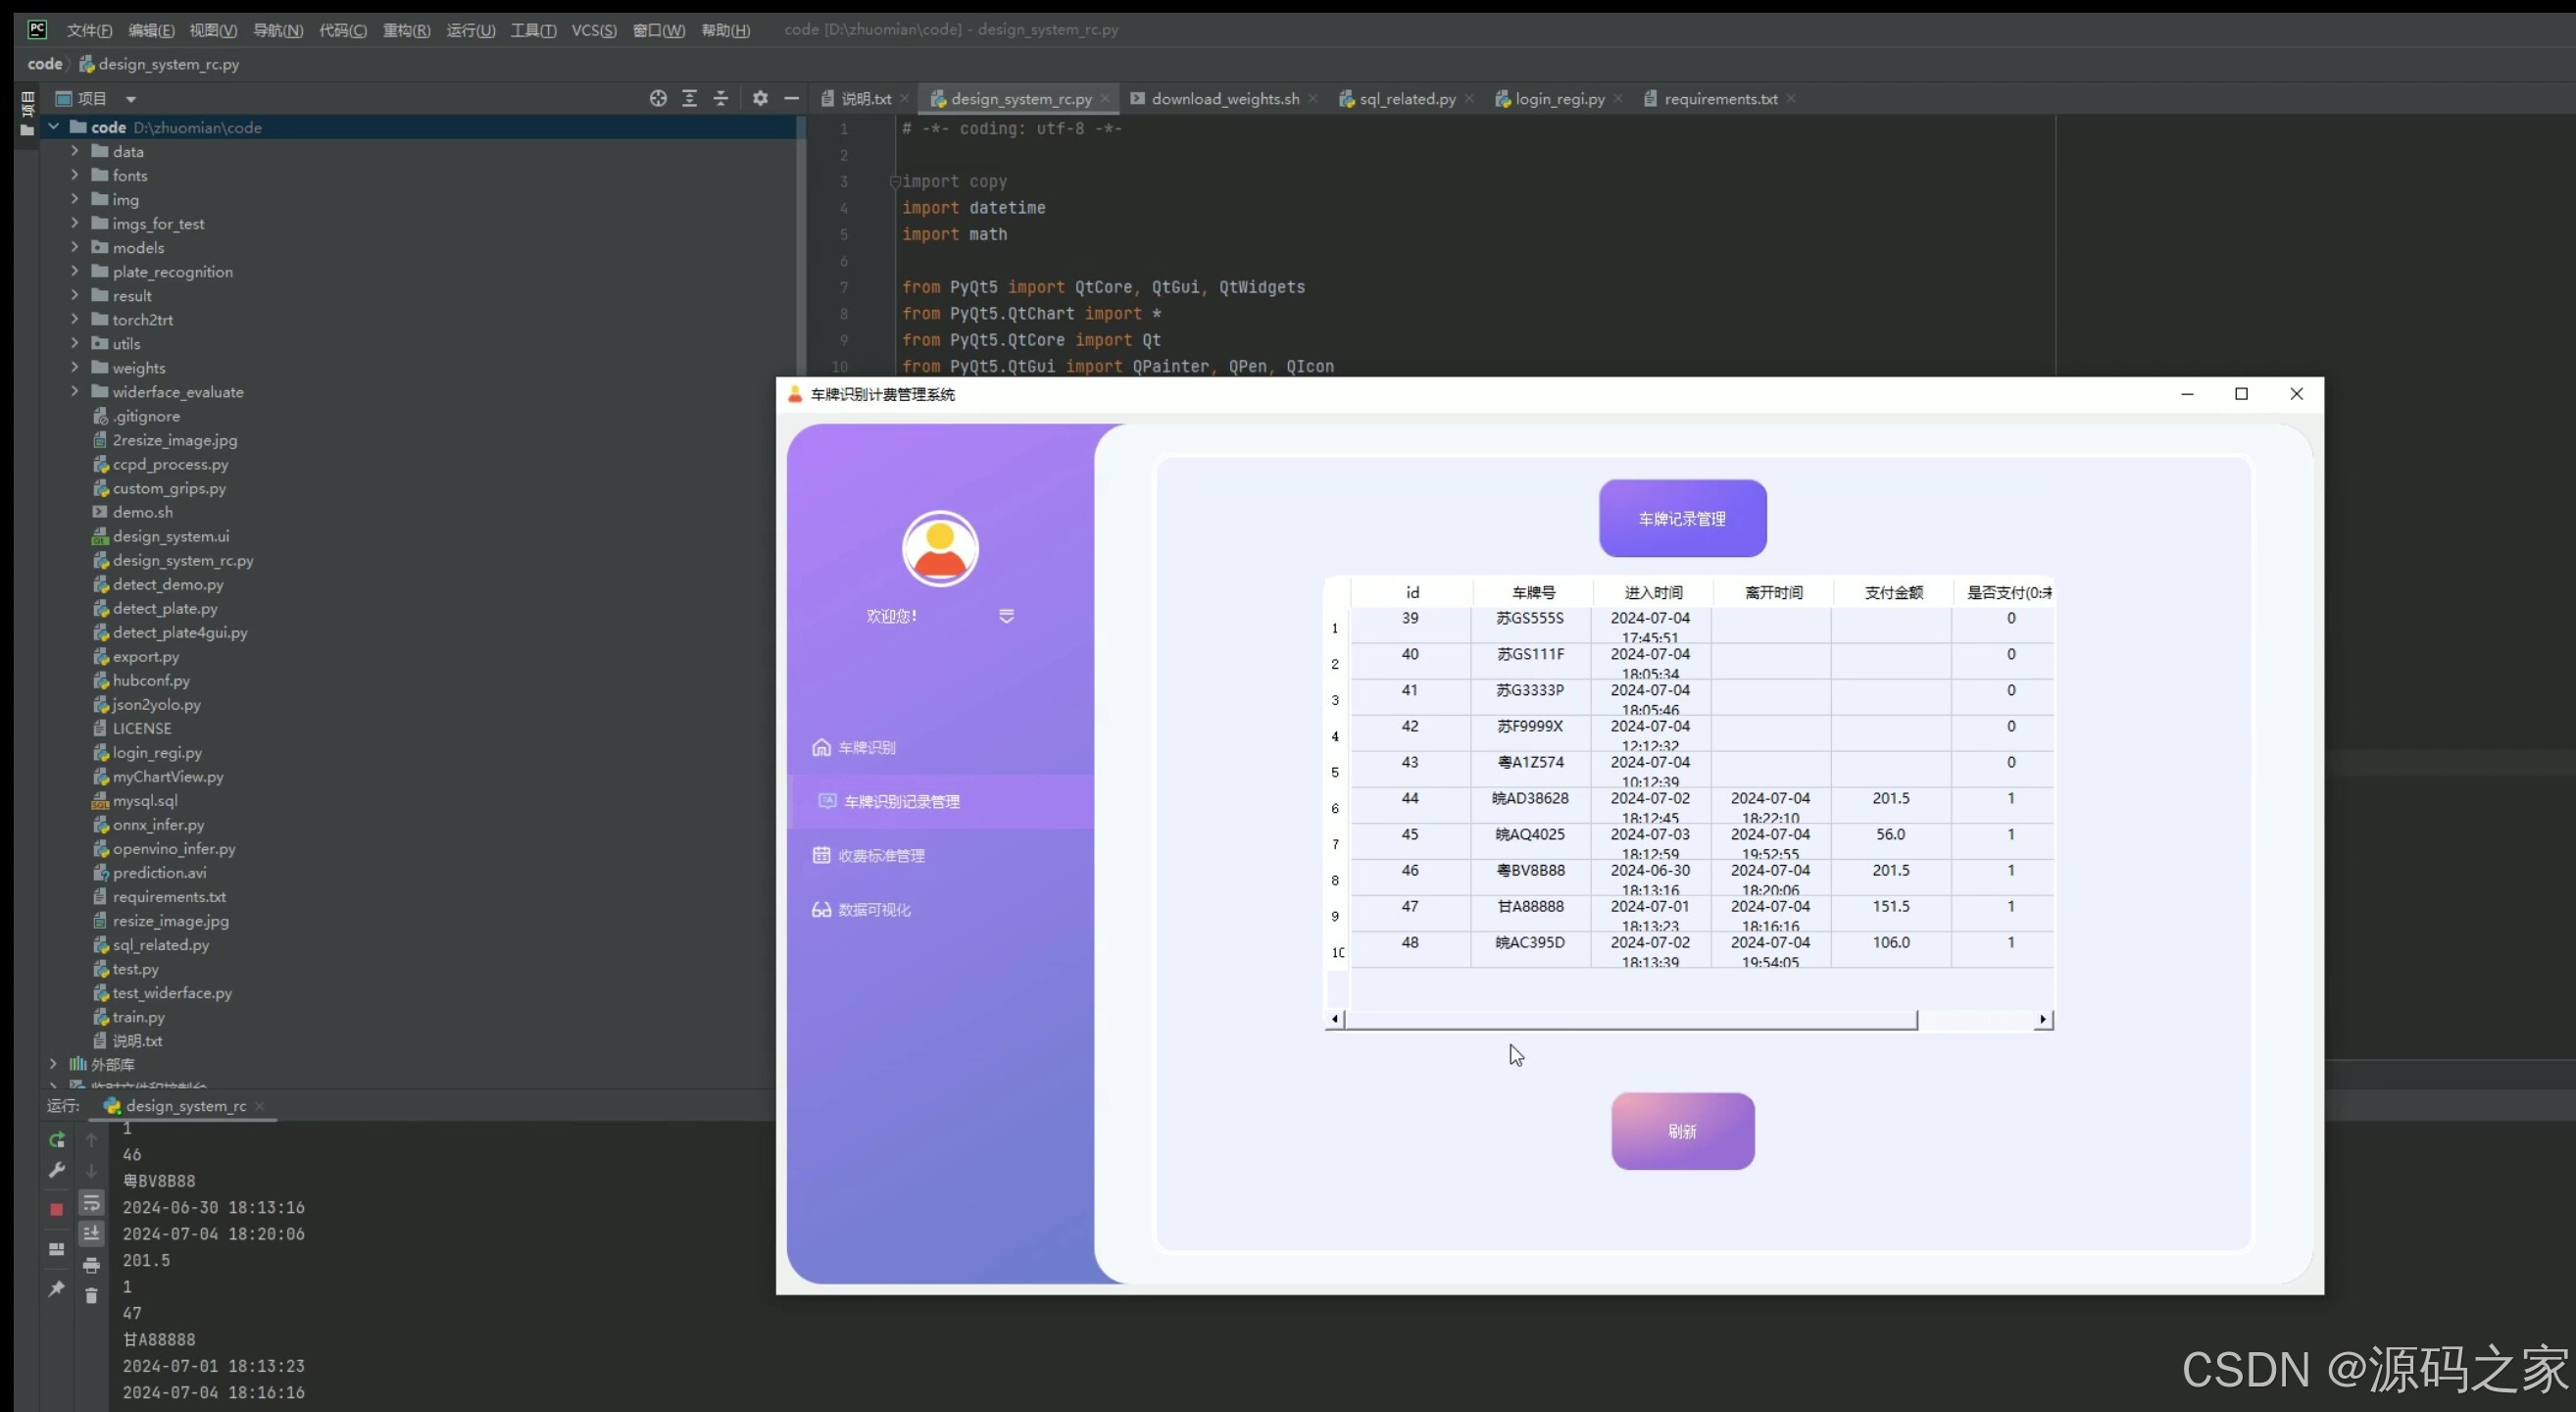
(4)识别记录数据管理
(5)停车计费标准设置管理

(6)视频检测识别—入库、出库

(7)摄像头实时检测识别–入库、出库
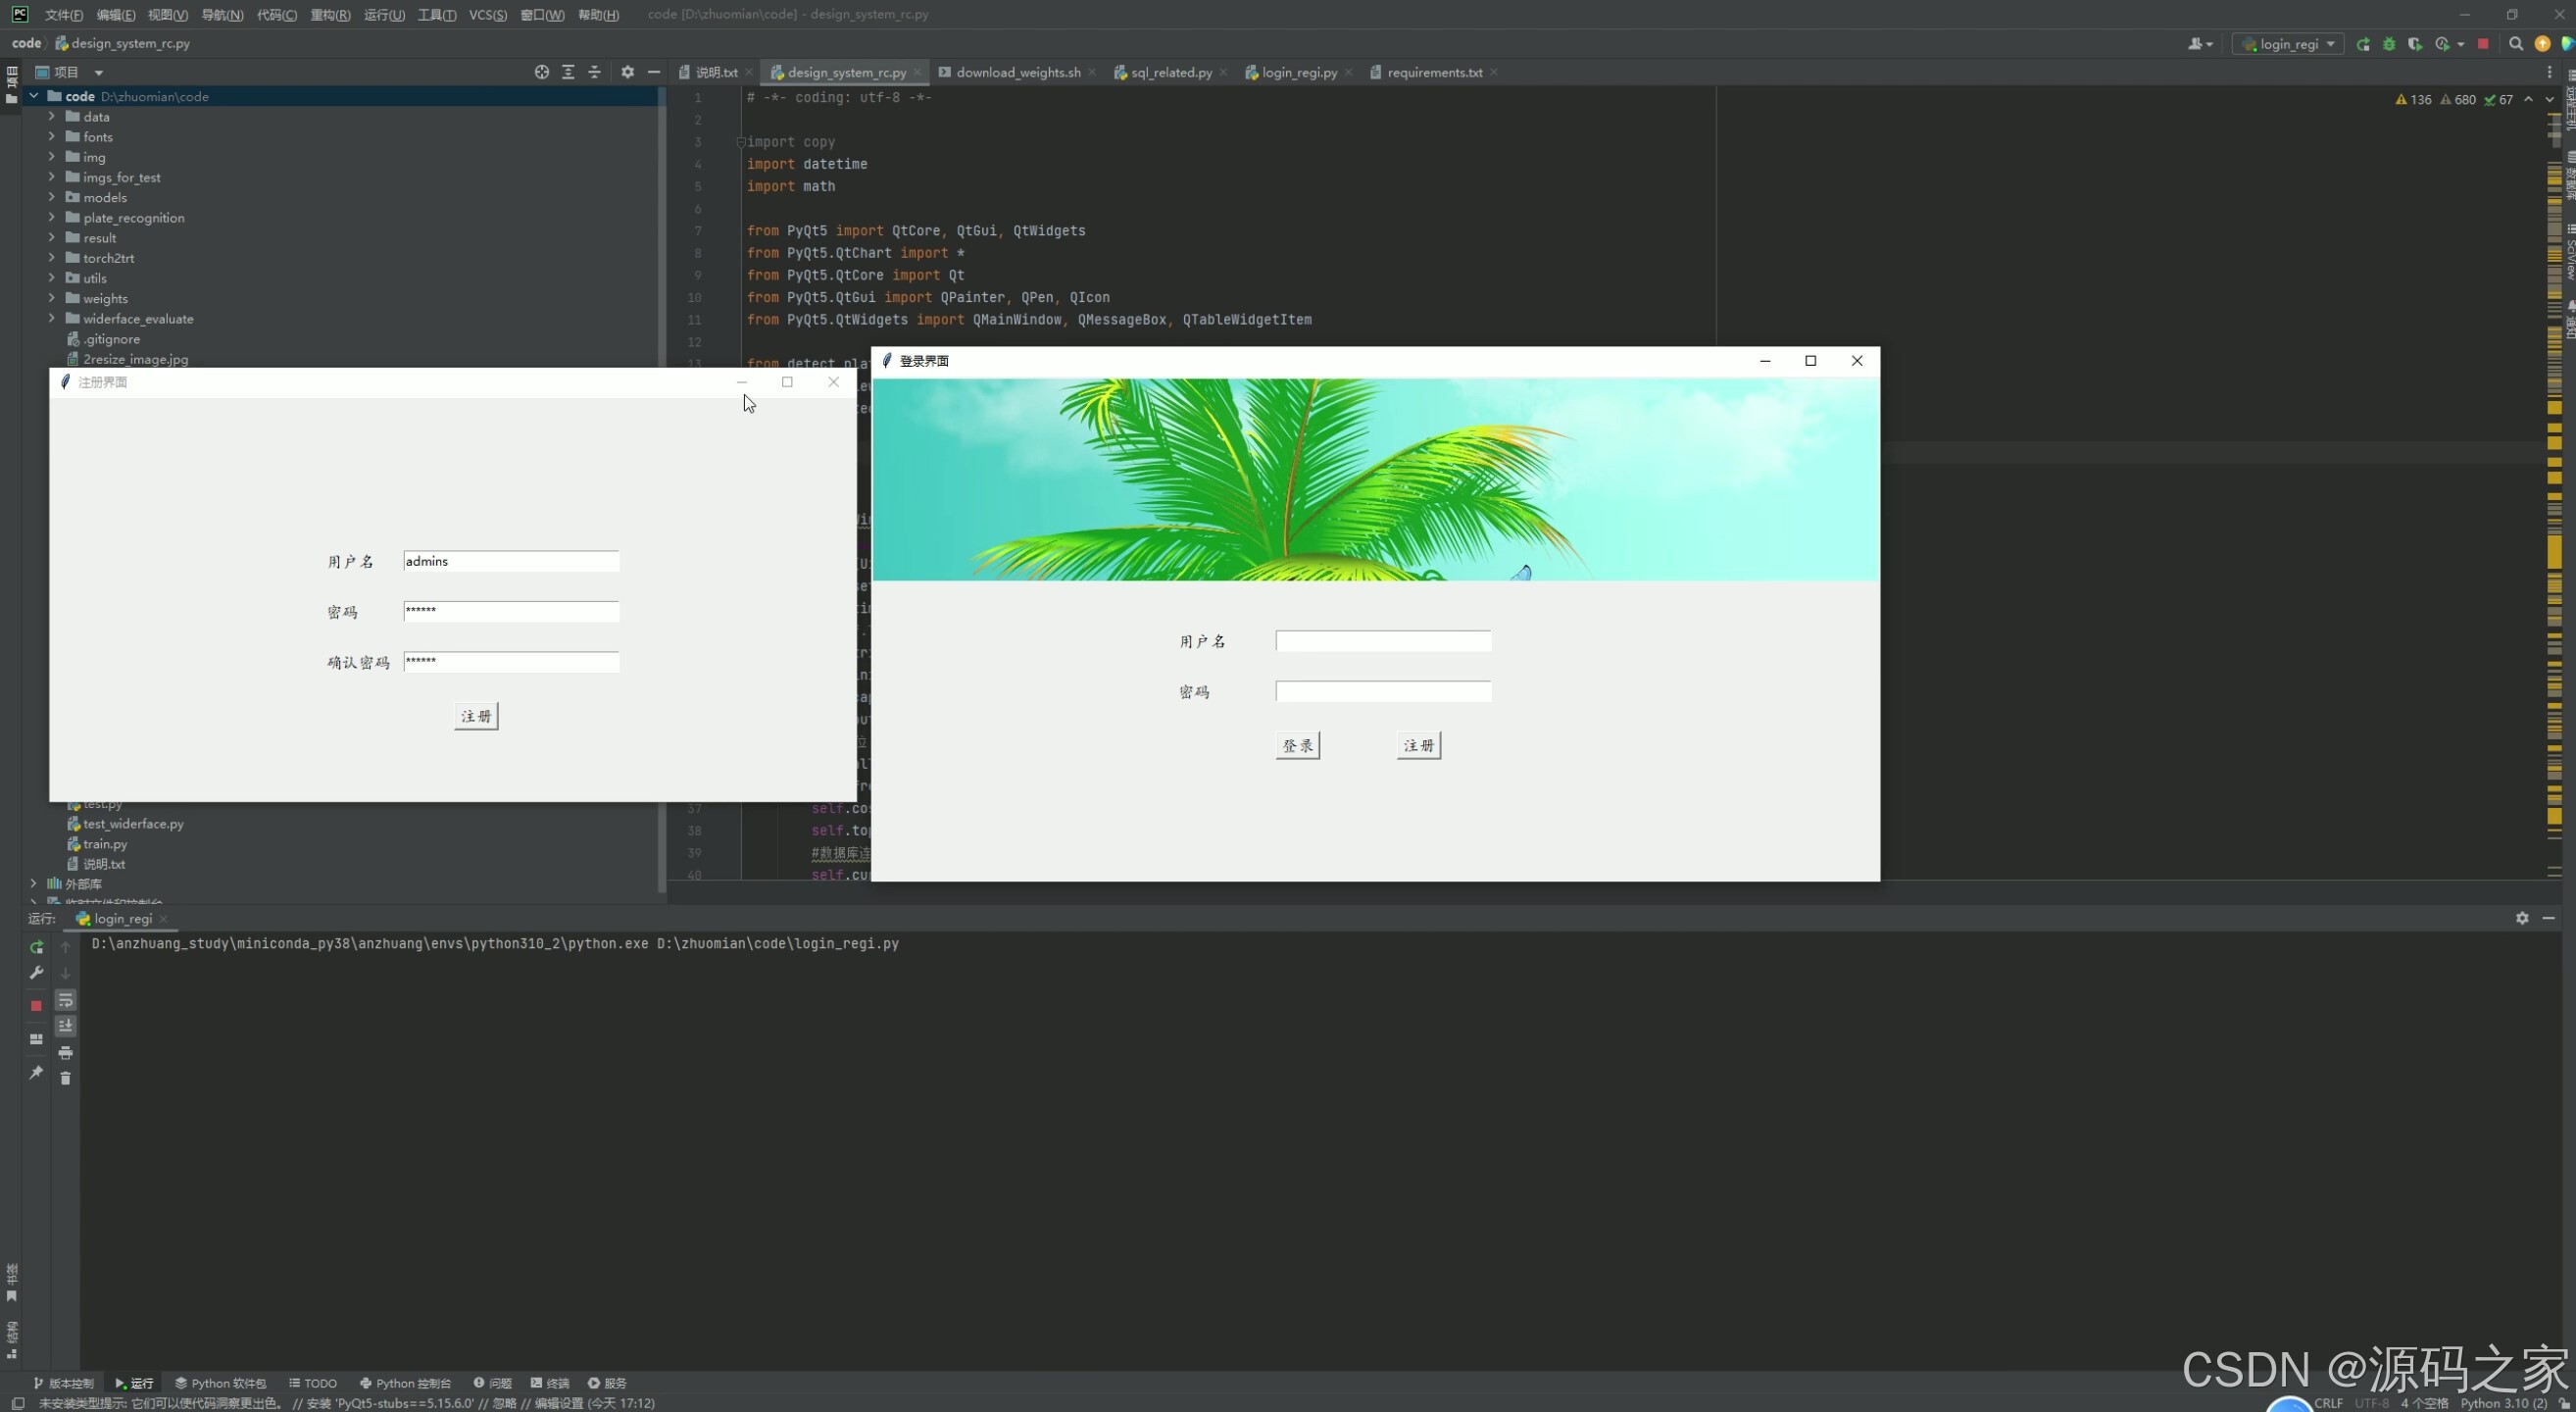
(8)注册登录
3、项目说明
1. 出库——车牌识别计费
- 功能描述:当车辆离开停车场时,系统通过车牌识别技术自动检测车牌号码,并根据车辆的入场时间和停车计费标准计算停车费用。
- 技术实现:使用YOLOv5或CRNN卷积神经网络进行车牌识别,结合MySQL数据库查询车辆的入场时间,通过Python计算停车费用,并通过PyQt5界面显示计费结果。
2. 入库——车牌识别
- 功能描述:当车辆进入停车场时,系统自动识别车牌号码,并记录入场时间。
- 技术实现:利用YOLOv5或CRNN进行车牌识别,将车牌号码和入场时间存储到MySQL数据库中,同时通过PyQt5界面显示车牌识别结果。
3. 数据分析可视化——停车数据、收费统计数据、饼图、折线图
- 功能描述:对停车场的停车数据和收费数据进行统计分析,并通过可视化图表(如饼图、折线图)展示。
- 技术实现:从MySQL数据库中提取停车数据和收费数据,使用Python的matplotlib库绘制饼图和折线图,通过PyQt5界面展示可视化结果。
4. 识别记录数据管理
- 功能描述:管理车牌识别记录,包括查看、搜索、删除等操作。
- 技术实现:通过PyQt5界面展示车牌识别记录,使用MySQL数据库进行数据存储和管理,支持查询、删除等操作。
5. 停车计费标准设置管理
- 功能描述:设置和管理停车场的停车计费标准,例如按小时计费、按天计费等。
- 技术实现:通过PyQt5界面提供计费标准设置功能,将计费标准存储到MySQL数据库中,方便后续计费计算时调用。
6. 视频检测识别——入库、出库
- 功能描述:通过视频流检测车辆的入库和出库,自动识别车牌号码。
- 技术实现:使用OpenCV读取视频流,结合YOLOv5或CRNN进行车牌识别,将识别结果和时间记录到MySQL数据库中。
7. 摄像头实时检测识别——入库、出库
- 功能描述:通过实时摄像头检测车辆的入库和出库,自动识别车牌号码。
- 技术实现:连接摄像头设备,使用OpenCV获取实时视频流,结合YOLOv5或CRNN进行车牌识别,将结果实时显示在PyQt5界面上。
8. 注册登录
- 功能描述:提供用户注册和登录功能,确保系统的安全性。
- 技术实现:使用PyQt5设计注册和登录界面,通过MySQL数据库存储用户信息,实现用户身份验证。
如果您需要进一步的详细说明或代码实现,可以告诉我,我会尽力为您提供帮助!
4、核心代码
# -*- coding: UTF-8 -*-
import argparse
import time
from pathlib import Path
import os
import cv2
import torch
import torch.backends.cudnn as cudnn
from numpy import random
import copy
import numpy as np
from models.experimental import attempt_load
from utils.datasets import letterbox
from utils.general import check_img_size, non_max_suppression_face, apply_classifier, scale_coords, xyxy2xywh, \
    strip_optimizer, set_logging, increment_path
from utils.plots import plot_one_box
from utils.torch_utils import select_device, load_classifier, time_synchronized
from utils.cv_puttext import cv2ImgAddText
from plate_recognition.plate_rec import get_plate_result,allFilePath,init_model,cv_imread
# from plate_recognition.plate_cls import cv_imread
from plate_recognition.double_plate_split_merge import get_split_merge

clors = [(255,0,0),(0,255,0),(0,0,255),(255,255,0),(0,255,255)]
danger=['危','险']
def order_points(pts):                   #四个点按照左上 右上 右下 左下排列
    rect = np.zeros((4, 2), dtype = "float32")
    s = pts.sum(axis = 1)
    rect[0] = pts[np.argmin(s)]
    rect[2] = pts[np.argmax(s)]
    diff = np.diff(pts, axis = 1)
    rect[1] = pts[np.argmin(diff)]
    rect[3] = pts[np.argmax(diff)]
    return rect


def four_point_transform(image, pts):                       #透视变换得到车牌小图
    # rect = order_points(pts)
    rect = pts.astype('float32')
    (tl, tr, br, bl) = rect
    widthA = np.sqrt(((br[0] - bl[0]) ** 2) + ((br[1] - bl[1]) ** 2))
    widthB = np.sqrt(((tr[0] - tl[0]) ** 2) + ((tr[1] - tl[1]) ** 2))
    maxWidth = max(int(widthA), int(widthB))
    heightA = np.sqrt(((tr[0] - br[0]) ** 2) + ((tr[1] - br[1]) ** 2))
    heightB = np.sqrt(((tl[0] - bl[0]) ** 2) + ((tl[1] - bl[1]) ** 2))
    maxHeight = max(int(heightA), int(heightB))
    dst = np.array([
        [0, 0],
        [maxWidth - 1, 0],
        [maxWidth - 1, maxHeight - 1],
        [0, maxHeight - 1]], dtype = "float32")
    M = cv2.getPerspectiveTransform(rect, dst)
    warped = cv2.warpPerspective(image, M, (maxWidth, maxHeight))
    return warped

def load_model(weights, device):   #加载检测模型
    model = attempt_load(weights, map_location=device)  # load FP32 model
    return model

def scale_coords_landmarks(img1_shape, coords, img0_shape, ratio_pad=None):  #返回到原图坐标
    # Rescale coords (xyxy) from img1_shape to img0_shape
    if ratio_pad is None:  # calculate from img0_shape
        gain = min(img1_shape[0] / img0_shape[0], img1_shape[1] / img0_shape[1])  # gain  = old / new
        pad = (img1_shape[1] - img0_shape[1] * gain) / 2, (img1_shape[0] - img0_shape[0] * gain) / 2  # wh padding
    else:
        gain = ratio_pad[0][0]
        pad = ratio_pad[1]

    coords[:, [0, 2, 4, 6]] -= pad[0]  # x padding
    coords[:, [1, 3, 5, 7]] -= pad[1]  # y padding
    coords[:, :8] /= gain
    #clip_coords(coords, img0_shape)
    coords[:, 0].clamp_(0, img0_shape[1])  # x1
    coords[:, 1].clamp_(0, img0_shape[0])  # y1
    coords[:, 2].clamp_(0, img0_shape[1])  # x2
    coords[:, 3].clamp_(0, img0_shape[0])  # y2
    coords[:, 4].clamp_(0, img0_shape[1])  # x3
    coords[:, 5].clamp_(0, img0_shape[0])  # y3
    coords[:, 6].clamp_(0, img0_shape[1])  # x4
    coords[:, 7].clamp_(0, img0_shape[0])  # y4
    # coords[:, 8].clamp_(0, img0_shape[1])  # x5
    # coords[:, 9].clamp_(0, img0_shape[0])  # y5
    return coords


def get_plate_rec_landmark(img, xyxy, conf, landmarks, class_num,device,plate_rec_model,is_color=False):  #获取车牌坐标以及四个角点坐标并获取车牌号
    h,w,c = img.shape
    result_dict={}
    tl = 1 or round(0.002 * (h + w) / 2) + 1  # line/font thickness

    x1 = int(xyxy[0])
    y1 = int(xyxy[1])
    x2 = int(xyxy[2])
    y2 = int(xyxy[3])
    height=y2-y1
    landmarks_np=np.zeros((4,2))
    rect=[x1,y1,x2,y2]
    for i in range(4):
        point_x = int(landmarks[2 * i])
        point_y = int(landmarks[2 * i + 1])
        landmarks_np[i]=np.array([point_x,point_y])

    class_label= int(class_num)  #车牌的的类型0代表单牌,1代表双层车牌
    roi_img = four_point_transform(img,landmarks_np)   #透视变换得到车牌小图
    if class_label:        #判断是否是双层车牌,是双牌的话进行分割后然后拼接
        roi_img=get_split_merge(roi_img)
    if not is_color:
        plate_number,rec_prob = get_plate_result(roi_img,device,plate_rec_model,is_color=is_color)                 #对车牌小图进行识别
    else:
        plate_number,rec_prob,plate_color,color_conf=get_plate_result(roi_img,device,plate_rec_model,is_color=is_color)
    # cv2.imwrite("roi.jpg",roi_img)
    result_dict['rect']=rect                      #车牌roi区域
    result_dict['detect_conf']=conf              #检测区域得分
    result_dict['landmarks']=landmarks_np.tolist() #车牌角点坐标
    result_dict['plate_no']=plate_number   #车牌号
    result_dict['rec_conf']=rec_prob   #每个字符的概率
    result_dict['roi_height']=roi_img.shape[0]  #车牌高度
    result_dict['plate_color']=""
    if is_color:
        result_dict['plate_color']=plate_color   #车牌颜色
        result_dict['color_conf']=color_conf    #颜色得分
    result_dict['plate_type']=class_label   #单双层 0单层 1双层

    return result_dict


def detect_Recognition_plate(model, orgimg, device,plate_rec_model,img_size,is_color=False):#获取车牌信息
    # Load model
    # img_size = opt_img_size
    conf_thres = 0.3      #得分阈值
    iou_thres = 0.5       #nms的iou值
    dict_list=[]
    # orgimg = cv2.imread(image_path)  # BGR
    img0 = copy.deepcopy(orgimg)
    assert orgimg is not None, 'Image Not Found '
    h0, w0 = orgimg.shape[:2]  # orig hw
    r = img_size / max(h0, w0)  # resize image to img_size
    if r != 1:  # always resize down, only resize up if training with augmentation
        interp = cv2.INTER_AREA if r < 1  else cv2.INTER_LINEAR
        img0 = cv2.resize(img0, (int(w0 * r), int(h0 * r)), interpolation=interp)

    imgsz = check_img_size(img_size, s=model.stride.max())  # check img_size

    img = letterbox(img0, new_shape=imgsz)[0]           #检测前处理,图片长宽变为32倍数,比如变为640X640
    # img =process_data(img0)
    # Convert
    img = img[:, :, ::-1].transpose(2, 0, 1).copy()  # BGR to RGB, to 3x416x416  图片的BGR排列转为RGB,然后将图片的H,W,C排列变为C,H,W排列

    # Run inference
    t0 = time.time()

    img = torch.from_numpy(img).to(device)
    img = img.float()  # uint8 to fp16/32
    img /= 255.0  # 0 - 255 to 0.0 - 1.0
    if img.ndimension() == 3:
        img = img.unsqueeze(0)

    # Inference
    # t1 = time_synchronized()/
    pred = model(img)[0]
    # t2=time_synchronized()
    # print(f"infer time is {(t2-t1)*1000} ms")

    # Apply NMS
    pred = non_max_suppression_face(pred, conf_thres, iou_thres)

    # print('img.shape: ', img.shape)
    # print('orgimg.shape: ', orgimg.shape)

    # Process detections
    for i, det in enumerate(pred):  # detections per image
        if len(det):
            # Rescale boxes from img_size to im0 size
            det[:, :4] = scale_coords(img.shape[2:], det[:, :4], orgimg.shape).round()

            # Print results
            for c in det[:, -1].unique():
                n = (det[:, -1] == c).sum()  # detections per class

            det[:, 5:13] = scale_coords_landmarks(img.shape[2:], det[:, 5:13], orgimg.shape).round()

            for j in range(det.size()[0]):
                xyxy = det[j, :4].view(-1).tolist()
                conf = det[j, 4].cpu().numpy()
                landmarks = det[j, 5:13].view(-1).tolist()
                class_num = det[j, 13].cpu().numpy()
                result_dict = get_plate_rec_landmark(orgimg, xyxy, conf, landmarks, class_num,device,plate_rec_model,is_color=is_color)
                dict_list.append(result_dict)
    return dict_list
    # cv2.imwrite('result.jpg', orgimg)

def draw_result(orgimg,dict_list,is_color=False):   # 车牌结果画出来
    result_str =""
    for result in dict_list:
        rect_area = result['rect']

        x,y,w,h = rect_area[0],rect_area[1],rect_area[2]-rect_area[0],rect_area[3]-rect_area[1]
        padding_w = 0.05*w
        padding_h = 0.11*h
        rect_area[0]=max(0,int(x-padding_w))
        rect_area[1]=max(0,int(y-padding_h))
        rect_area[2]=min(orgimg.shape[1],int(rect_area[2]+padding_w))
        rect_area[3]=min(orgimg.shape[0],int(rect_area[3]+padding_h))

        height_area = result['roi_height']
        landmarks=result['landmarks']
        result_p = result['plate_no']
        if result['plate_type']==0:#单层
            result_p+=" "+result['plate_color']
        else:                             #双层
            result_p+=" "+result['plate_color']+"双层"
        result_str+=result_p+" "
        for i in range(4):  #关键点
            cv2.circle(orgimg, (int(landmarks[i][0]), int(landmarks[i][1])), 5, clors[i], -1)
        cv2.rectangle(orgimg,(rect_area[0],rect_area[1]),(rect_area[2],rect_area[3]),(0,0,255),2) #画框

        labelSize = cv2.getTextSize(result_p,cv2.FONT_HERSHEY_SIMPLEX,0.5,1) #获得字体的大小
        if rect_area[0]+labelSize[0][0]>orgimg.shape[1]:                 #防止显示的文字越界
            rect_area[0]=int(orgimg.shape[1]-labelSize[0][0])
        orgimg=cv2.rectangle(orgimg,(rect_area[0],int(rect_area[1]-round(1.6*labelSize[0][1]))),(int(rect_area[0]+round(1.2*labelSize[0][0])),rect_area[1]+labelSize[1]),(255,255,255),cv2.FILLED)#画文字框,背景白色

        if len(result)>=1:
            orgimg=cv2ImgAddText(orgimg,result_p,rect_area[0],int(rect_area[1]-round(1.6*labelSize[0][1])),(0,0,0),21)
            # orgimg=cv2ImgAddText(orgimg,result_p,rect_area[0]-height_area,rect_area[1]-height_area-10,(0,255,0),height_area)

    print(result_str)
    return orgimg


def get_second(capture):
    if capture.isOpened():
        rate = capture.get(5)   # 帧速率
        FrameNumber = capture.get(7)  # 视频文件的帧数
        duration = FrameNumber/rate  # 帧速率/视频总帧数 是时间,除以60之后单位是分钟
        return int(rate),int(FrameNumber),int(duration)


if __name__ == '__main__':
    parser = argparse.ArgumentParser()
    parser.add_argument('--detect_model', nargs='+', type=str, default='weights/plate_detect.pt', help='model.pt path(s)')  #检测模型
    parser.add_argument('--rec_model', type=str, default='weights/plate_rec_color.pth', help='model.pt path(s)')#车牌识别+颜色识别模型
    parser.add_argument('--is_color',type=bool,default=True,help='plate color')      #是否识别颜色
    parser.add_argument('--image_path', type=str, default='F:\\pesonal_file\\projuect_for_sale\\ALPR-master\\save', help='source')     #图片路径
    parser.add_argument('--img_size', type=int, default=640, help='inference size (pixels)')  #网络输入图片大小
    parser.add_argument('--output', type=str, default='result', help='source')               #图片结果保存的位置
    parser.add_argument('--video', type=str, default='F:\\pesonal_file\\projuect_for_sale\\ALPR-master\\save\\test.mp4', help='source')                       #视频的路径
    device = torch.device("cuda" if torch.cuda.is_available() else "cpu")                     #使用gpu还是cpu进行识别
    # device =torch.device("cpu")
    opt = parser.parse_args()
    print(opt)
    save_path = opt.output
    count=0
    if not os.path.exists(save_path):
        os.mkdir(save_path)

    detect_model = load_model(opt.detect_model, device)  #初始化检测模型
    plate_rec_model=init_model(device,opt.rec_model,is_color=opt.is_color)      #初始化识别模型
    #算参数量
    total = sum(p.numel() for p in detect_model.parameters())
    total_1 = sum(p.numel() for p in plate_rec_model.parameters())
    print("detect params: %.2fM,rec params: %.2fM" % (total/1e6,total_1/1e6))

    # plate_color_model =init_color_model(opt.color_model,device)
    time_all = 0
    time_begin=time.time()
    if not opt.video:     #处理图片
        if not os.path.isfile(opt.image_path):            #目录
            file_list=[]
            allFilePath(opt.image_path,file_list)  #将这个目录下的所有图片文件路径读取到file_list里面
            for img_path in file_list:             #遍历图片文件

                print(count,img_path,end=" ")
                time_b = time.time()               #开始时间
                img =cv_imread(img_path)           #opencv 读取图片

                if img is None:
                    continue
                if img.shape[-1]==4:               #图片如果是4个通道的,将其转为3个通道
                    img=cv2.cvtColor(img,cv2.COLOR_BGRA2BGR)
                # detect_one(model,img_path,device)
                dict_list=detect_Recognition_plate(detect_model, img, device,plate_rec_model,opt.img_size,is_color=opt.is_color)#检测以及识别车牌
                ori_img=draw_result(img,dict_list)  #将结果画在图上
                img_name = os.path.basename(img_path)
                save_img_path = os.path.join(save_path,img_name)  #图片保存的路径
                time_e=time.time()
                time_gap = time_e-time_b                         #计算单个图片识别耗时
                if count:
                    time_all+=time_gap
                cv2.imwrite(save_img_path,ori_img)               #opencv将识别的图片保存
                count+=1
            print(f"sumTime time is {time.time()-time_begin} s, average pic time is {time_all/(len(file_list)-1)}")
        else:                                          #单个图片
                print(count,opt.image_path,end=" ")
                img =cv_imread(opt.image_path)
                if img.shape[-1]==4:
                    img=cv2.cvtColor(img,cv2.COLOR_BGRA2BGR)
                # detect_one(model,img_path,device)
                dict_list=detect_Recognition_plate(detect_model, img, device,plate_rec_model,opt.img_size,is_color=opt.is_color)
                ori_img=draw_result(img,dict_list)
                img_name = os.path.basename(opt.image_path)
                save_img_path = os.path.join(save_path, img_name)
                cv2.imwrite(save_img_path,ori_img)


    else:    #处理视频
        video_name = opt.video
        capture=cv2.VideoCapture(video_name)
        fourcc = cv2.VideoWriter_fourcc(*'mp4v')
        fps = capture.get(cv2.CAP_PROP_FPS)  # 帧数
        width, height = int(capture.get(cv2.CAP_PROP_FRAME_WIDTH)), int(capture.get(cv2.CAP_PROP_FRAME_HEIGHT))  # 宽高
        out = cv2.VideoWriter('result.mp4', fourcc, fps, (width, height))  # 写入视频
        frame_count = 0
        fps_all=0
        rate,FrameNumber,duration=get_second(capture)
        if capture.isOpened():
            while True:
                t1 = cv2.getTickCount()
                frame_count+=1
                print(f"第{frame_count} 帧",end=" ")
                ret,img=capture.read()
                if not ret:
                    break
                # if frame_count%rate==0:
                img0 = copy.deepcopy(img)
                dict_list=detect_Recognition_plate(detect_model, img, device,plate_rec_model,opt.img_size,is_color=opt.is_color) # 这个就是需要的结果了 # TODO
                ori_img=draw_result(img,dict_list)
                t2 =cv2.getTickCount()
                infer_time =(t2-t1)/cv2.getTickFrequency()
                fps=1.0/infer_time
                fps_all+=fps
                str_fps = f'fps:{fps:.4f}'

                cv2.putText(ori_img,str_fps,(20,20),cv2.FONT_HERSHEY_SIMPLEX,1,(0,255,0),2)
                # cv2.imshow("haha",ori_img)
                # cv2.waitKey(1)
                out.write(ori_img)

        else:
            print("失败")
        capture.release()
        out.release()
        cv2.destroyAllWindows()
        print(f"all frame is {frame_count},average fps is {fps_all/frame_count} fps")
5、源码获取方式
🍅由于篇幅限制,获取完整文章或源码、代做项目的,查看【用户名】、【专栏名称】就可以找到我啦🍅
感兴趣的可以先收藏起来,点赞、关注不迷路,下方查看👇🏻获取联系方式👇🏻
转载自CSDN-专业IT技术社区
原文链接:https://blog.csdn.net/vx_biyesheji0001/article/details/155359986